How to Prevent Mold in a New Build
 Jan, 19 2026
Mold Prevention Risk Calculator
New Build Mold Risk Assessment
Determine your home's vulnerability to mold growth based on key construction factors. Enter your specific details to get personalized prevention advice.
Your Mold Risk Assessment
Building a new home is exciting-until you find black spots on the walls or a musty smell in the closet. Mold doesn’t just ruin finishes; it can weaken framing, trigger allergies, and cost thousands to fix. The good news? In a new build, mold is almost always preventable. You don’t need magic solutions or expensive gadgets. You need smart design, proper materials, and disciplined construction practices.
Control moisture from day one
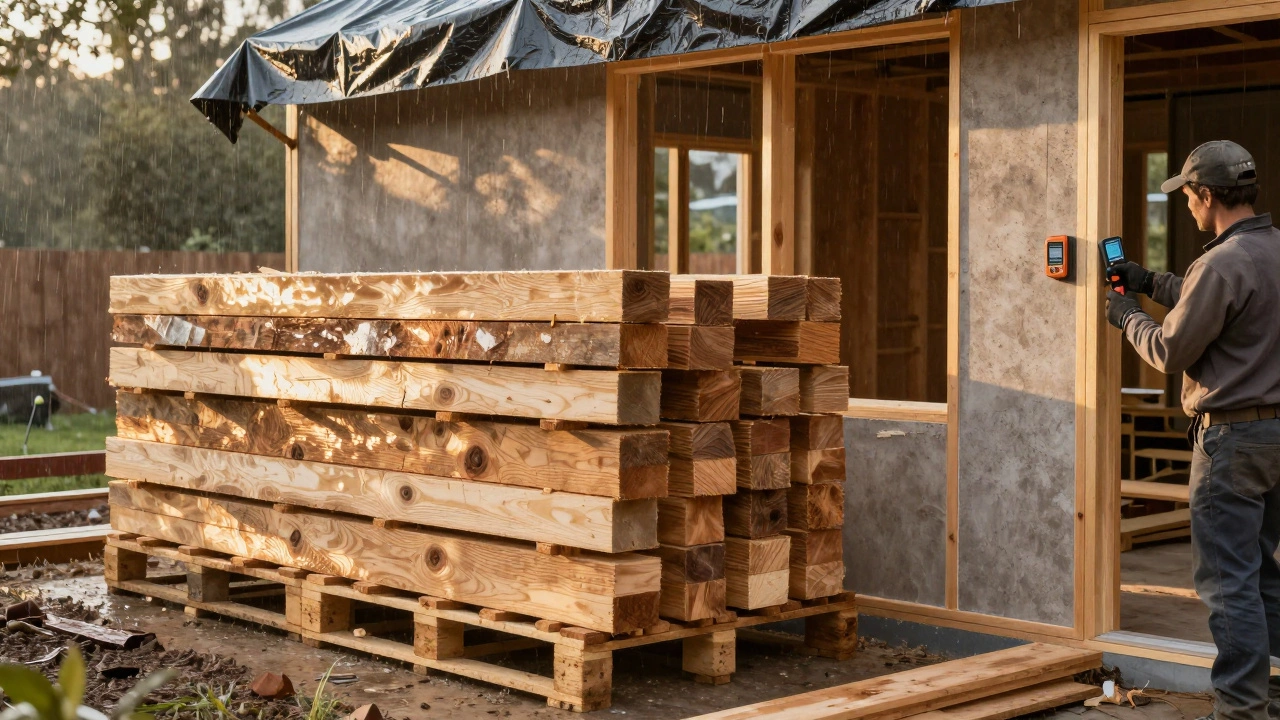
Mold needs three things to grow: food (like drywall or wood), warmth, and moisture. In a new build, moisture is the only one you can fully control. The biggest mistake builders make? Assuming that because the house is new, it’s dry. Rain, snow, and even high humidity during construction can soak materials before the roof is even sealed.
Stacked lumber left out in the rain? That’s a mold starter kit. Drywall panels stored on concrete floors? They’ll absorb moisture like sponges. Always store building materials under cover, off the ground, and ventilated. Use plastic sheeting to protect framing if rain is forecasted. If wood or drywall gets wet during construction, let it dry completely before closing it in. Waiting a few extra days now saves you from tearing out walls later.
Design for airflow, not just aesthetics
A beautiful open-plan home won’t help if air can’t move. Mold thrives in stagnant pockets-behind cabinets, under sinks, inside closets with no ventilation. Plan your layout with airflow in mind. Avoid placing bedrooms or bathrooms directly against exterior walls without insulation. Use exhaust fans that vent to the outside, not just into the attic. In bathrooms, kitchens, and laundry rooms, install fans rated for at least 80 cubic feet per minute (CFM) and run them for 20 minutes after each use.
Also, skip the overly tight sealant on windows and doors. While you want to keep air out in winter, you need controlled ventilation in summer. A house that’s too airtight without mechanical ventilation traps moisture inside. Consider a heat recovery ventilator (HRV). These systems pull stale, moist air out and bring in fresh air while keeping heating or cooling costs low. In Wellington’s damp climate, an HRV isn’t optional-it’s essential.
Use mold-resistant materials
You wouldn’t build a boat without waterproofing. Don’t build a home without mold-resistant materials. Start with drywall. Look for products labeled as “mold-resistant” or “paperless.” These use fiberglass mats instead of paper backing, which mold can’t feed on. Brands like USG Durock or CertainTeed’s Mold Tough are common in professional builds.
For bathrooms and basements, use cement board instead of drywall behind tile. It doesn’t absorb water. For subfloors, choose treated plywood or OSB rated for moisture exposure. Even paint matters. Use interior paints with antimicrobial additives, especially in bathrooms and laundry rooms. These aren’t magic shields, but they slow mold growth if moisture slips through.
Seal the envelope properly
Your home’s “envelope” is the barrier between the inside and outside. If it’s leaky, moisture gets in-and stays. Start with the foundation. Ensure the ground slopes away from the house at least 1 inch per foot for the first 6 feet. Install proper drainage: French drains, gravel beds, and perforated pipes that carry water away from the foundation.
Flash windows and doors correctly. Use peel-and-stick membrane under siding and around penetrations. Don’t skip the housewrap. Products like Tyvek or Typar let water vapor escape but block liquid water. Install it over sheathing before siding goes on. If the housewrap is torn or taped poorly, water gets behind it and hides in the wall cavity for months before you notice.
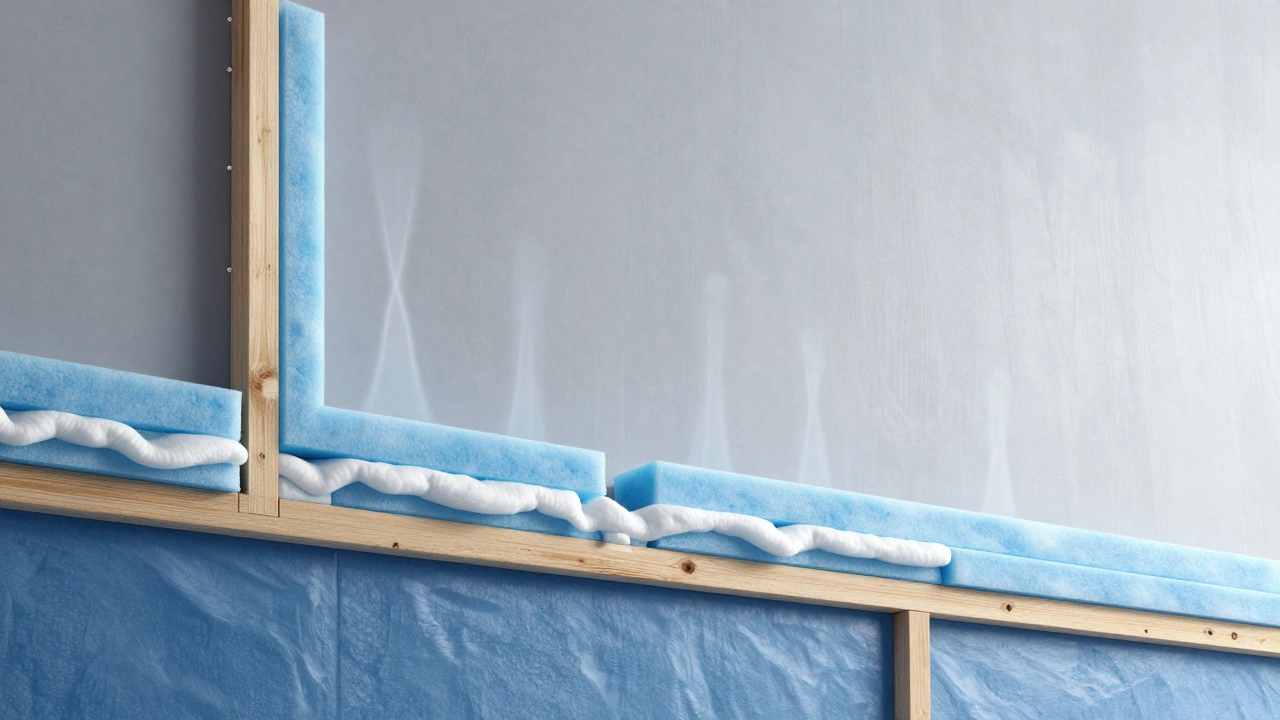
Insulation matters too. Fiberglass batts can trap moisture if installed wrong. Spray foam insulation, especially closed-cell, acts as both insulator and vapor barrier. It’s more expensive upfront, but it seals gaps and stops condensation in one step. For stud walls, use rigid foam board on the exterior side of the sheathing. This keeps the wall cavity warmer, reducing condensation risk.
Install a vapor barrier-right
Vapor barriers are misunderstood. In cold climates, you put them on the warm side of the wall. In warm, humid climates, you don’t use them at all. In places like Wellington, where winters are damp and summers are cool, the rule is simple: don’t install a vapor barrier on the inside of the wall.
Instead, use a smart vapor retarder like MemBrain or Intello Plus. These materials change their permeability based on humidity. When it’s dry, they block moisture. When it’s humid, they let it breathe out. This prevents moisture from getting trapped in the wall. Avoid plastic sheeting behind drywall-it turns your walls into a steam chamber.
Let the house breathe after construction
Even if every material is perfect, mold can still grow if you seal up the house too soon. New lumber, drywall, and paint release moisture for weeks after installation. Don’t close up the house and turn on the heat immediately. Keep windows open for at least 2-4 weeks after drywall is finished. Run dehumidifiers if indoor humidity stays above 60%. Use fans to push air through rooms.
Wait until the relative humidity drops below 50% before installing carpets, upholstered furniture, or curtains. These materials hold moisture and become mold magnets. Test humidity with a digital hygrometer. You can buy one for under $20. If it reads above 60% for more than a few days, you’ve got a problem.
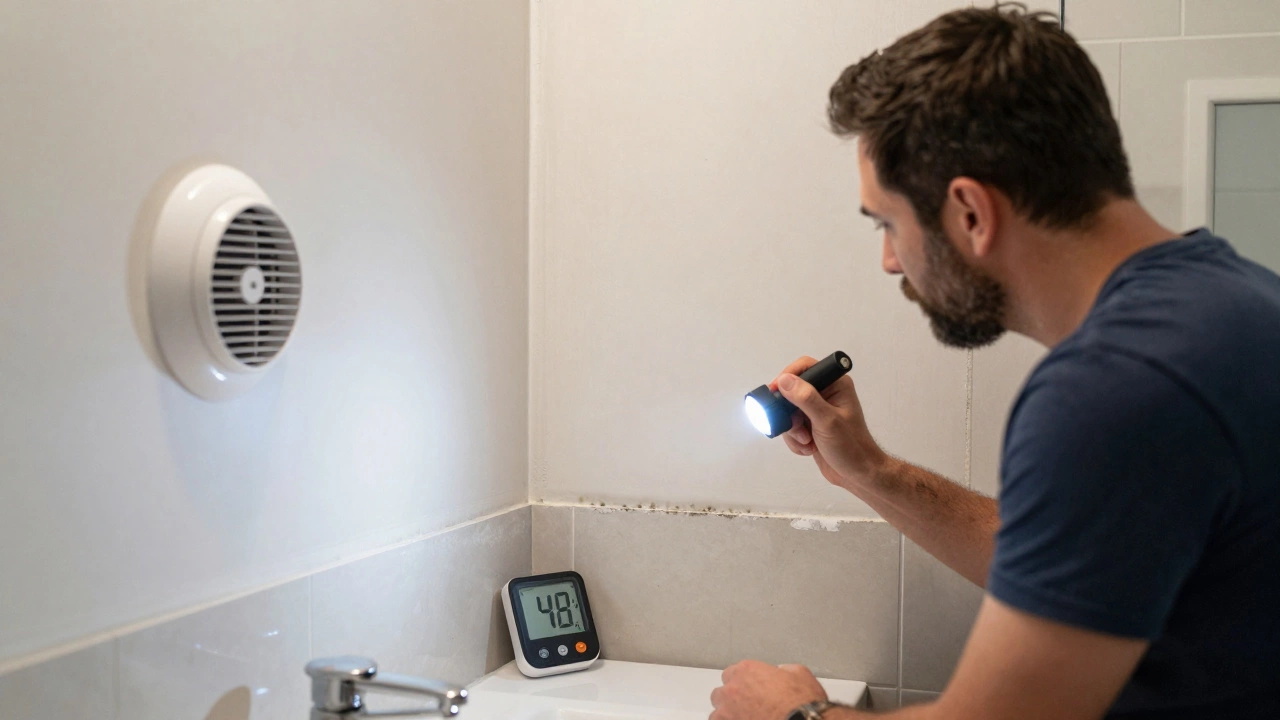
Inspect before you move in
Don’t trust the builder’s word. Do your own walkthrough before signing off. Bring a flashlight and a small mirror. Look behind baseboards, under sinks, in the attic, and around windows. Smell the air in closets and bathrooms. If it smells earthy or musty, don’t move in until you find the source.
Ask for the builder’s moisture readings. Reputable builders use moisture meters on framing, subfloors, and drywall. Readings above 16% moisture content in wood mean it’s still wet. Anything over 20% is a red flag. If they can’t or won’t show you these numbers, walk away.
What happens if mold shows up anyway?
If you find mold after moving in, don’t panic-but don’t ignore it either. Small spots on painted drywall can be cleaned with vinegar and water. But if it’s behind tiles, under flooring, or on insulation, it’s not a surface problem. That means moisture is still entering the wall. You need to find and fix the source before cleaning. Otherwise, it comes back.
Never paint over mold. That’s like putting a bandage on a broken bone. The mold keeps growing, and now it’s hidden. Hire a certified mold inspector if you’re unsure. They’ll take air samples and swabs to confirm what you’re dealing with. In New Zealand, look for professionals certified by the New Zealand Indoor Air Quality Association.
Prevention beats cleanup every time
Mold in a new build isn’t bad luck. It’s a failure of process. The same mistakes happen over and over: rushed timelines, cheap materials, skipped inspections. You can avoid it. Prioritize moisture control over speed. Choose materials that resist mold. Demand proof that the structure is dry before closing walls. And never underestimate the power of ventilation.
A mold-free home doesn’t cost more-it costs less in the long run. You save on repairs, health bills, and stress. And you get to breathe easier-literally.
Can I use regular drywall in a bathroom if I paint it with mold-resistant paint?
No. Regular drywall has a paper backing that mold feeds on, even with paint on top. Mold-resistant paint only slows surface growth-it doesn’t stop mold from growing behind the paint if moisture gets in. Use paperless drywall or cement board in bathrooms. It’s a small extra cost that prevents big problems later.
Is a dehumidifier necessary in a new home?
Not always, but often yes-especially in damp climates like Wellington. During the first few months after construction, materials release moisture. A dehumidifier helps bring indoor humidity down to safe levels (below 50%). Once the house is dry and you have good ventilation (like an HRV), you can turn it off. But if you notice condensation on windows or a musty smell, keep it running.
Should I install a vapor barrier on the inside of my walls?
No, not in New Zealand’s climate. Interior vapor barriers trap moisture inside the wall cavity, leading to condensation and mold. Instead, use a smart vapor retarder like MemBrain that adjusts to humidity levels. It lets moisture escape when needed, without letting it in from outside.
How do I know if my builder is doing it right?
Ask for moisture meter readings on framing and drywall before closing walls. They should be under 16%. Ask if they’re using housewrap, proper flashing, and mold-resistant materials. Check if they’re storing materials under cover and letting them dry before installation. If they can’t answer these questions confidently, find someone else.
Can mold grow in a new home within the first year?
Yes-and it often does. If the home was built during a wet season, materials weren’t dried properly, or ventilation is poor, mold can appear in as little as 30 days. It doesn’t wait years to show up. That’s why inspections before occupancy are critical.