How to Stop Foundation Leaks from the Inside: A Complete Guide
 Jun, 18 2026
Foundation Leak Diagnosis & Cost Estimator
Step 1: Identify Your Leak Type
Answer these questions to determine the likely cause of your water intrusion.
Step 2: Estimate Repair Costs
Calculate potential costs based on your situation. Estimates are averages for professional services.
Waking up to a damp floor or seeing water seeping through your foundation walls is one of the most stressful experiences for a homeowner. It’s not just an eyesore; it’s a threat to your property’s structural integrity and your health. Moisture invites mold, rot, and pests, turning your safe haven into a hazard zone. The good news? You don’t always need to tear up your yard to fix it. Interior solutions are often more cost-effective and less invasive than exterior excavation.
Stopping a foundation leak from the inside requires a systematic approach. It’s not about slapping some paint over a wet wall. It’s about understanding where the water is coming from, stopping its entry, and managing any remaining moisture effectively. Whether you live in Wellington with our high water tables or anywhere else with similar soil conditions, these principles apply universally.
Identifying the Source of the Leak
Before you buy a single bucket or bag of cement, you need to know exactly where the water is entering. Water follows gravity and path of least resistance. If you treat the symptom without addressing the cause, the water will simply find another way in.
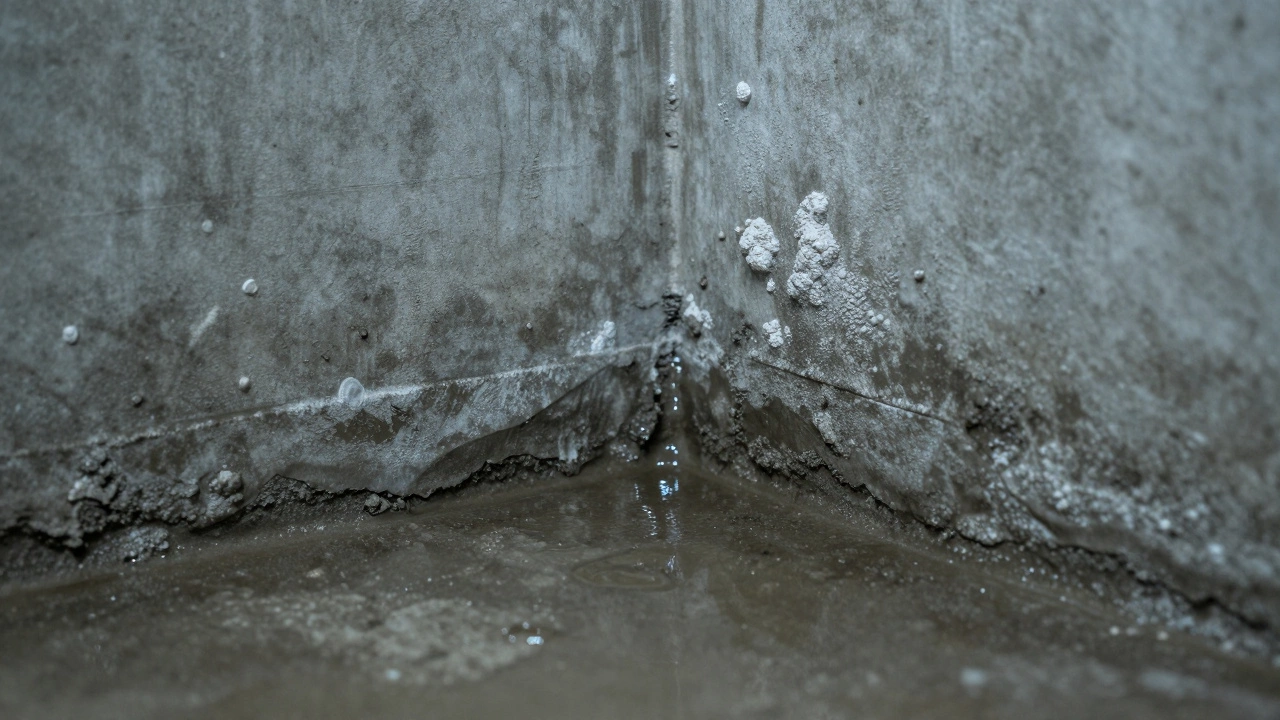
Is the water coming from the walls or the floor?
Check the junction where the wall meets the floor (the cove joint). This is the most common entry point. If water appears here, it’s likely hydrostatic pressure pushing groundwater up through the slab or down through the footing. If water is spraying from a specific crack higher up the wall, it might be a direct breach in the concrete.
Look for these tell-tale signs:
- Efflorescence: White, chalky deposits on the concrete. This means water has passed through the concrete, dissolved minerals, and evaporated, leaving the salt behind. It indicates chronic dampness.
- Active Dripping: Water dripping from cracks or joints during heavy rain. This suggests a direct pathway for surface water or groundwater.
- Puddling at the Base: Water accumulating along the bottom edge of the wall. This is classic hydrostatic pressure.
Immediate Temporary Fixes
If you’re dealing with an active leak right now, you need to stop the flow immediately to prevent further damage while you plan a permanent solution. These are not long-term fixes, but they buy you time.
- Hydraulic Cement: For active leaks where water is flowing under pressure, hydraulic cement is your best friend. It sets quickly, even underwater. Clean the area, pack the cement tightly into the crack or hole, and hold it there for a few minutes until it hardens. Brands like Quikrete or Sika offer reliable options available at most hardware stores.
- Sump Pump Bucket Trick: If water is pooling in a corner, place a small submersible sump pump in a bucket. Run the discharge hose out a window or door. This keeps the floor dry temporarily.
- Plastic Sheeting: Line the affected area with heavy-duty plastic sheeting taped to the walls and floor. This protects your belongings and flooring from immediate water damage.

Permanent Interior Solutions
Once the emergency is handled, it’s time for a permanent fix. Interior waterproofing focuses on managing water that has already entered the foundation system. Here are the most effective methods.
1. Crack Injection
For hairline cracks or larger fissures in the concrete walls, epoxy or polyurethane injection is highly effective.
Epoxy Injection is a process where a strong adhesive resin is pumped into cracks to bond the concrete back together. Use this for non-moving cracks where structural integrity needs restoration. It creates a bond stronger than the original concrete.Polyurethane foam, on the other hand, expands when it contacts water. It’s ideal for active leaks because it seals the crack and stops water flow instantly. The foam remains flexible, accommodating minor shifts in the foundation without breaking the seal.
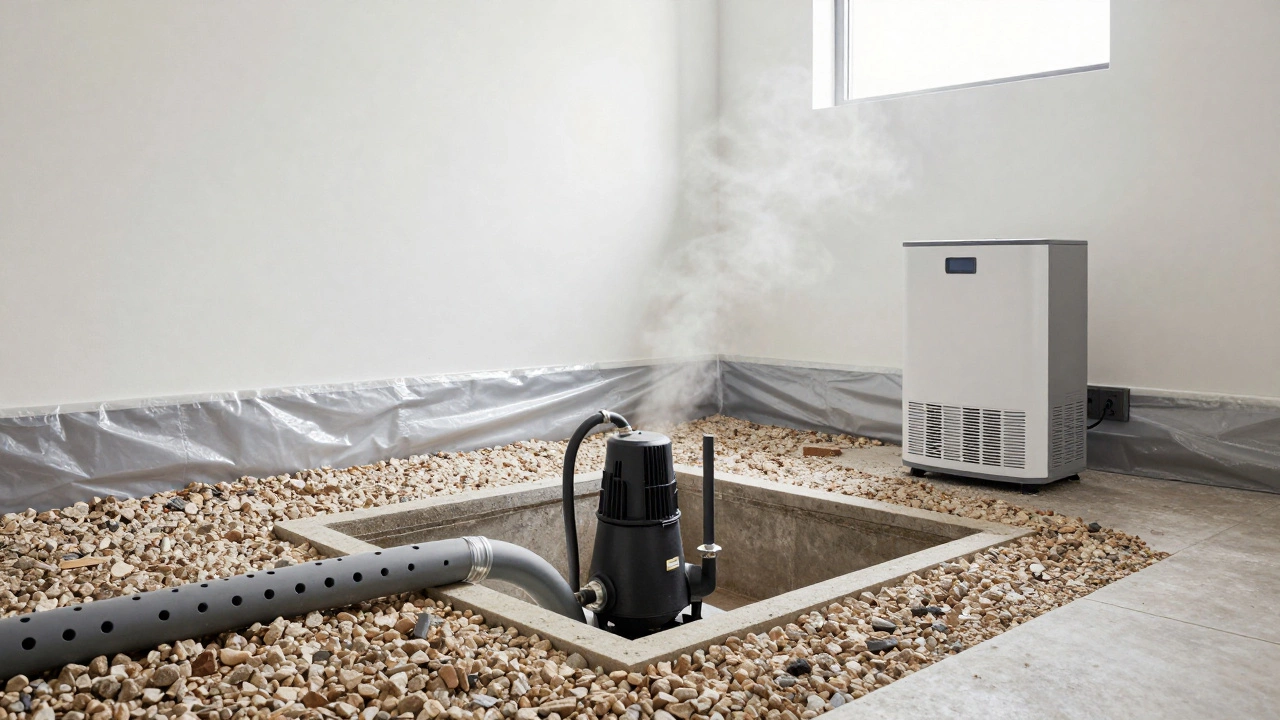
2. Interior Drainage Systems
If water is entering through the cove joint (where the wall meets the floor), sealing cracks won’t solve the problem. The pressure is too great. You need to relieve that pressure by installing an interior perimeter drain system.
This involves:
- Chasing a channel along the base of the interior walls.
- Installing a perforated pipe surrounded by gravel.
- Connecting the pipe to a sump pit.
- Using a sump pump to eject water away from the house.
This system intercepts water before it can rise into your living space. It’s considered the gold standard for hydrostatic pressure issues. Companies like Ridgid or Basement Systems offer comprehensive kits and professional services for this.
3. Sump Pump Installation
A sump pump is the workhorse of interior waterproofing. It sits in a pit (sump basin) and automatically turns on when water levels rise, pumping the water out through a discharge line.
| Type | Best For | Lifespan | Noise Level |
|---|---|---|---|
| Submersible | Most homes, quieter operation | 7-10 years | Low |
| Pedestal | Budget-friendly, easier maintenance | 25+ years | High |
| Battery Backup | Power outages, critical protection | 3-5 years (battery) | Varies |
Always install a battery backup system. Power outages often coincide with heavy storms, which is when you need your sump pump the most. Without a backup, your basement could flood rapidly.
4. Vapor Barriers and Dehumidification
Even after stopping visible leaks, humidity can remain high. Concrete breathes, allowing moisture vapor to pass through. To combat this:
- Vapor Barrier: Install a 10-mil or thicker polyethylene sheeting on the walls. Seal all seams with tape. This prevents moisture from entering the air and condensing on surfaces.
- Dehumidifier: Use a high-capacity dehumidifier to keep relative humidity below 50%. This inhibits mold growth and makes the space comfortable. Look for units with Energy Star ratings to manage electricity costs.
When to Call a Professional
While many interior repairs are DIY-friendly, some situations require expert intervention. Call a licensed foundation repair specialist if:
- The cracks are wider than 1/4 inch or show signs of vertical displacement (one side is higher than the other).
- You notice bowing walls or significant structural movement.
- The water intrusion is severe and persistent despite temporary measures.
- You suspect soil instability outside the home is contributing to the problem.
In Wellington, where clay soils expand and contract with moisture changes, professional assessment is crucial. A specialist can determine if exterior drainage improvements are also needed to complement interior fixes.
Maintenance Tips to Prevent Future Leaks
Prevention is cheaper than cure. Once your foundation is dry, maintain it:
- Gutter Maintenance: Clean gutters regularly. Ensure downspouts extend at least 6 feet away from the foundation.
- Grading: Check the slope of your yard. Soil should slope away from the house at a minimum of 6 inches over 10 feet.
- Inspect Annually: Walk around your home twice a year. Look for new cracks, erosion, or pooling water near the foundation.
- Test Your Sump Pump: Pour a bucket of water into the sump pit to ensure the pump activates and discharges properly.
Can I paint over a damp foundation wall?
No. Painting over damp concrete traps moisture inside, leading to blistering, peeling, and potential structural damage. Always address the source of the moisture first. Only use masonry paint designed for damp areas after the wall is completely dry and sealed.
How much does interior waterproofing cost?
Costs vary widely based on the severity and method. Simple crack injection might cost $50-$150 per crack. A full interior perimeter drain system with a sump pump can range from $3,000 to $8,000. DIY materials are cheaper, but professional installation ensures warranty coverage and correct engineering.
Will interior waterproofing affect my property value?
Yes, positively. A dry, finished basement adds livable square footage to your home, increasing its market value. Conversely, unresolved water issues can significantly decrease value and deter buyers. Document your repairs for future sale disclosures.
Is epoxy better than polyurethane for crack injection?
It depends on the crack type. Epoxy is rigid and best for structural bonding of static cracks. Polyurethane is flexible and expands to stop active water flow. For leaking cracks, polyurethane is generally preferred. For non-leaking structural cracks, epoxy is better.
How do I know if my sump pump is failing?
Signs include frequent cycling (turning on/off rapidly), unusual noises (grinding or screeching), failure to activate during a test, or a constantly running pump. Regular maintenance and testing every few months can catch these issues early.